Thursday, August 7, 2008

Spooling up and ready for departure 737-300

Here I am in the left seat of a 737-300. Feet on the rudders, left hand on the controls and Rt hand on the throttle. It just doesn't get any better this. 737-300 you are clear for the active, clear for departure runway 27 Thanks to my new best friend Captain Fred, someone has to take the picture and someones got to fly this thing! Clear for departure runway 27... 300 roger...

Believe it or not I'm walking on air I never thought I could be so free eee, flying away on a wing and a prayer who could believe, believe it or not its just me eee.

Sunday, August 3, 2008

Ideas from Brodhead

As I said earlier last Saturday was great an entire day to spend with Piet builders and Pietenpol airplanes, naturally I came away with some great pics and some even better ideas. Which I plan top add to mine.

Today I spent some time adding wedges at critical support junctions to strengthen the fuse. I also look at the spot for the front pit seat belt harness mount. Plus I added some meat to the turtle deck ribs. They are not structural but Herb R, my tech counselor suggested I bring a few of them up a bit so they will show nicely under the fabric covering. The process didn't take too much time as a rough add in which was more than I needed but I am planning on shaving them into the right size and shape. So its all clamped and setting up as I write this tonight.

The areas I worked on were small and I believe pictures would not do them justice so no pics for that area.

Rear storage compartment and instrument board

Here is a view of the secret storage panel and door from the inside, once covered this will all be a mystery. Another view of the instrument board. I got forced into the varnishing of it early. One night my Grand son came down to visit and to sit in the front pit, he knows that's his seat. He had a bag of chips and every where he touched the mahogany he left little greasy hand prints. I had to re sand everywhere his hands touched wood, not one of the happier experiences. Avoiding that again forced the varnish coat. I haven't varnished any of the fuse yet as I may be adding features that have to be glued. Glue doesn't do a real good job of holding when the grain has been sealed with varnish.

I really want my glue to adhere the best it can and as much as possible. I have to build this thing like my life depends on it, oh ya it does, good point!


Saturday, August 2, 2008

No storage area is complete without the little door

No storage panel is complete without its very own little door, so just above the rear cockpit seat is the access point to my storage compartment. The door is large enough to fit essential items and yet too small for luggage or the temptation of over loading it. I suppose its much like a brief case or a woman's purse, no matter how big it is, its always too small and grossly overloaded.

We still have that CG thing to contend with and with a tail heavy aircraft more weight aft of the CG is an invitation for control issues. So no luggage in here. Actually with the exception of some needed emergency gear. This are will only be fully utilized post landing for helmet, goggles, scarf and till the other cool barnstormer open cockpit accouterments and some more modern, radio headset that stuff too.

turtle deck storage

Here is a view of the fuse from the tail post and vertical stabilizer. I added floor panel under the turtle deck right behind the rear pit seat. Storage compartments in a Piet from what I have see so far are at a premium so why not add storage where ever I can. The build can be a time of solitude and reflection as each piece is hand cut, fit, glued and clamped into place. There are times when perspective can be lost in the midst of saw dust and glue. So on the right of the picture on the buildings' structural
support post I keep inspirational pictures of finished projects. Not that I want the build process to end but more of keeping an eye on the prize. I am having a time wrestling with a logo and paint scheme one that is classic yet cutting edge, unique but not over done. I keep looking at other projects and like their paint and design schemes and logo graphics, yet nothing has come to me as the ultimate design.
This being the labor of love that its become maybe I'll call it Pinocchio which makes me Gepitto not to certain I am in favor of that moniker, I think for now I'll keep on looking.

Tuesday, July 29, 2008

Pietenpol Mecca


I took a weekend and on Saturday I had a chance to visit with a bunch of friends at the annual Pietenpol Fly in. The event was hosted at Brodhead airport, Brodhead Wisconsin and as usual I met some old friends, made some new ones and talked trash about the ones that didn't make it, sorry Jim M. That's just the way it it goes and since this is the second year it was twice as bad.
We hung out most of the day with Rick S, who flew his tripacer in from Valpo great looking bird. Rick has got a Piet project running. I got a chance to see it this past winter at his home, great guy, great build ad a real nice person to hang out with. I am looking for great things from his build.

Last year was my first time I got to meet some of the old timers, Mike C . I think he is related to Dick Clark the guy doesn't age.

The best part was had my buddy Dennis V in attendance he say the miracle of the piet first hand I even hooked him up with a ride in a non Piet certified aircraft from another builder friend, Dan H.

Here they are in Dans bird, Dennis in the pilot seat first time in a tail dragger and hes gonna get to fly it courtesy of Dan, as a matter of fact so did I and it was wonderful. Thanks Dan! great bird, great fun and a real pleasure to finally get to meet you.


Dennis really loved it! I think hes coming back next year too well if I have anything to say about it he will.

Turtle deck

During all that fitting and grinning I decided to try my hand at building the turtle deck. So once again I went to my trusty table saw and began to rip some more sticks fro m the bigger sticks I had in stock. After eating much saw dust I came away with some really long skinny strips of wood that when set on edge it to their respective bridge location, clamped and held in pace with a clamp and band started to shape up into the turtle deck.

That was the easy part, Once began the project in earnest it revealed that I was not ready for the challenge of actually building the turtle deck. by the time I got it to the point of considering gluing it it I had a don of hours in and ate a ton of saw dust trying to get them to fit properly. Making the fuse wider impacted the angle at which the longerons bent inward to join at the tail post aft the rear pit. That severe bend was also part of the turtle deck and impacted the bends ad proximity of each stringer as I went. I sure would have found the process of keeping the stringers in place if I was equipped with about 6 more hands

Instrument boards


I got a chance to see what she looked like with the instrument boards in place. I liked them to they became part of the build, at least as they are tried in place for the fit test. Seats installed in place always need a place to park it,while you fly it and something to look at so I chose instruments from the seat as a nice thing to look at on occasion while flying

Friday, July 11, 2008

final decision on the door

Well I got it all glued in supported side to side and top to bottom, and still haven't cut it.

I had an EAA tec counselor Herb visit and check the project and he cautioned against cutting the upper longeron for the door.

Herb is a structural engineer and carpenter he suggested against it and that was enough for me. So its frame, supported, glued in and solid so now I am not going to cut it.

No sense going against good advice especially when it confirms my own concerns.

Thursday, July 3, 2008

built the seat base frames


Went according to plan and built the seat base frames for the front and rear pits. Didn't like the way the rear pit came out and decided to rebuild it later on in the cycle. I got that done, and I like it much better. I also added a few touches of my own to make the seat more usable. I figure its my airplane so I can build it the way I want it. Ahhhh yes the beauty of being an independent Piet builder.

seat backs clamped into place


I got the seat backs clamped into place, the door supported and the load from the upper longerons redistributed, I got the front seat base in and working on the rear pit seat bracing. Plus I got some varnishing done.

Finally vacation time arrives

I saved all my vacation time for last 2 weeks in December, I can take all my vacation plus extend due to the Holiday season and really get building, so that's what I did. I got the seat backs mucked up and cut in the seat feet, control passages and seat base support. We are cooking now and no more builders block, nothing but sawdust and glue.

seats and partitions

I started with the rear seat, just locating where the backrest was supposed to go for the rear and forwad pits.

The Block continued

All summer with the exception of some sanding I did nothing but stare at the wood. I came to the realization that after sever days and no change, that unless I did the building it was always going to look just the way I left. No work during the summer.

As fall approaches I am sanding more and enjoying it lessbut still waiting for my project to speak to me, she finally did and I was re energized and ready to go. Plus I thought that cutting the seats out couldn't hurt anything so I started to build the seat areas.

Following the first seat cuts she spoke to me and the seats led me to more areas to build and so I did.

The Block

By late spring early summer it became evident that there was no way I could continue the build at any sort of pace, the yard demanded most my entire weekend and the time I did have, I didn't know what to do next! I hit the dreaded builders block, afraid to move forward for fear of getting out of step and afraid if I didn't do anything I may walk away form the project forever. Each weekend day, mostly Sunday afternoons I go , look and hope I would get the insight into whats next. Some days looking and some days sanding, most days looking, thinking and hoping an idea would come to me.

Jumping the gun


I could no longer resist, I had to see if it could look like and airplane rather than a canoe. Now that I got the longerons bent and joined at the tail I had to add the vert stab to see it.
Everyone can use a little inspiration so I jumped the gun and clamped that bad boy on and in place. I just had to see it for myself.

door frame


I framed out the front door location and glued it inplace, still not certain about unsing it or leaving it.
Just something about cutting the longeron for something simple as a door, I am not too certain I trust the door framing to give the suppport I think I need.
I am really hesitant about cutting longerons for an added feature that may or may not prove valuable.
I am going to ask other builders and trusted sources to get a better fix on moving stress loads to the lower longeron of just not cut the door in.

The saga of the door


I had heard of other builders adding a front pit door to make it easier for people to get in and out of. I thought it was a pretty neat idea and certainly something that may be appreciated by riders so I went through and identified where I wanted it. then came up with a design to bolster the structure and re direct the stress loads of the upper longeron.


I came up with this design and location as a possible location for the door installation

Monday, June 30, 2008

Lost Pics

The next shot in the sequence is the joining of the fuse halves, unfortunately or fortunately I was shooting pics and saving them on multiple computers.. The unfortunate part was that the one with the pics I wanted for this posting were on the puter that fried the drive. So none f those pics are available. Bending the poplar halves into shape was an adventure because I made the fuse 2 inches wide so the bend to join the tail was more abrupt than to plan. That caused considerably more stress on the newly formed poplar fuse sides and longerons
Somewhere between build pics the computer with many of my pics the drive got fried so I ended up searching all around for what pics I did have. Obviously the ones I had joining the fuse are gone. So none to show in that phase sorry to say, I am just glad I had more then one computer to save on so at least I have some of the early pics remaining at my disposal.

Vert stab


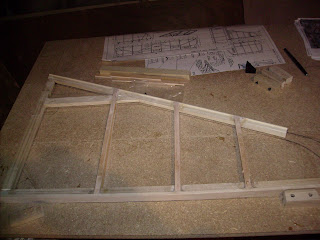
A guy has do do something while waiting for the epoxy to cure so its time to do some more layout work on another assembly while the epoxy cures

Both Fuse on the bench


Here are both fuse halves on the bench, upside down and unjoined anchored t the bench. The bench in all of this was used as a structural jig. With the addition of some small pieces of wood and deck screws (Deck Screws, which should be featured as a modern marvels)

Wednesday, June 25, 2008

Longeron parts

The longerons have been cut for scarf joints these are the longest pieces of the airframe and the have to be glued together to get them to the required length. The wood is yellow poplar a really nice wood to work with.

I am using West Systems epoxy for all my adhesive needs and the famous Dennis V scarfOmatic cutting Jig to set the scarf cuts

Getting ready for the build All systems are GO!

The fuse sides have been drawn on the bench top surface which will act as the jig to hold the fuse parts as they are set and glued in place

me at the bench

Here I am at the bench the 2 sides of the fuse hanging behind me and getting ready to move on